
Automate database documentation with SchemaSpy and Docker
Database documentation is often utilized by system analysts, QA engineers, and technical writers (like myself!) to deeply understand an application’s internal logic and behavior. It’s rare to encounter a database with detailed comments; more often than not, they are entirely absent. This is where SchemaSpy comes to the rescue!
Automate database documentation with SchemaSpy and Docker
SchemaSpy connects to an existing database, collects all tables, comments, views, procedures, and illustrates relationships. It generates static HTML/JS/CSS files that look great right out of the box. It’s a versatile tool for database analysis.
SchemaSpy has comprehensive documentation, so all the standard procedures like installation or quick start are well covered. Let’s delve into the more complex topics.
Note: All examples provided are for PostgreSQL 16.
Quick overview
SchemaSpy can be run using Java or Docker.
SchemaSpy can utilize config files.
SchemaSpy have the meta file feature, which allows to store comments to database in an external file.
The general procedure for documenting a new database:
- Install Graphviz.
- Run SchemaSpy once.
- Obtain
.xmlfile from the output and transform it into a meta file. Add comments to tables and fields using markdown. - Run SchemaSpy again with the meta file.
- Congratulations, you now have comprehensive database documentation!
Run with Docker
This is the docker-compose.yml file I use to generate database documentation, which can be easily integrated into CI/CD pipelines.
Folder structure:
output/
config/
drivers/
meta/
layout/
docker-compose.yml
version: '3'

services:
  dbdoc:
    image: schemaspy/schemaspy:latest
    volumes:
      - ./output/dbname:/output # generated documentation will be here
      - ./config:/config # config files
      - ./drivers:/drivers # custom drivers if needed
      - ./meta:/meta # meta file to read comments to tables
      - ./layout:/layout # customized html layout
    container_name: "schemaspy_local"
    command: [ # custom command to run
      "-configFile",
      "/config/dbname.properties", # specify config file
      "-t",
      "/config/pgsql11_t.properties" # specify database type custom config
    ]
Volumes (folders should exits in the folder with docker-compose.yml):
output– a destination folder for the SchemaSpy outputconfig– config files for a database connectiondrivers– custom drivers for a databasemeta– meta files with commentslayout– html template to use for the output
The command to run Docker:
docker-compose run dbdoc --build
Of course, it won’t run properly yet because we haven’t configured any settings.
Config file
Config files are stored inside the config folder.
I use two config files: one for describing the database connection and SchemaSpy arguments, and another to customize PostgreSQL SQL scripts.
Here is the general config file pgsql11_t.properties for database connection, with comments:
# type of database. Run with -dbhelp for details
schemaspy.t=pgsql11
# optional path to alternative jdbc drivers.
schemaspy.dp=postgresql-42.7.0.jar
# database properties: host, port number, name user, password
schemaspy.host=host.docker.internal #this is for localhost, specify IP for the remote
schemaspy.port=5432
schemaspy.db=dbname
schemaspy.u=postgres
schemaspy.p=123456
# output dir to save generated files
schemaspy.o=dbdoc
# db scheme for which generate diagrams
schemaspy.s=public
schemaspy.meta=meta/dbname.xml
# use vizjs for better diagrams. Don't forget to install https://graphviz.org/
schemaspy.vizjs=true
# it there are many tables, don't use paging
schemaspy.noTablePaging=true
schemaspy.norows=true
The PostgreSQL config file can help address certain limitations and overwrite database type. For PostgreSQL, I use this property file to fix incorrect field type collection:
# improve the display of table parameter types; see
# <https://github.com/schemaspy/schemaspy/issues/490> for details
extends=pgsql11
selectColumnTypesSql=WITH tables AS ( \
    SELECT c.oid AS _oid, c.relname AS _tab \
    FROM pg_catalog.pg_class c LEFT JOIN pg_catalog.pg_namespace n ON n.oid = c.relnamespace \
    WHERE n.nspname = :schema \
    ), \
    cols AS ( \
    SELECT a.attrelid AS _oid, a.attname AS _col, pg_catalog.format_type(a.atttypid, a.atttypmod) AS _type \
    FROM pg_catalog.pg_attribute a WHERE a.attnum > 0 AND NOT a.attisdropped \
    ) \
    SELECT _tab AS table_name, _col AS column_name, _type AS column_type, _type AS short_column_type \
    FROM tables INNER JOIN cols USING (_oid)
Foreign tables
By default, SchemaSpy doesn’t collect foreign tables. To include them, use the following config file pgsql11_ft.properties.
extends=pgsql11
tableTypes=TABLE,FOREIGN TABLE
selectColumnTypesSql=WITH tables AS ( \
    SELECT c.oid AS _oid, c.relname AS _tab \
    FROM pg_catalog.pg_class c LEFT JOIN pg_catalog.pg_namespace n ON n.oid = c.relnamespace \
    WHERE n.nspname = :schema \
    ), \
    cols AS ( \
    SELECT a.attrelid AS _oid, a.attname AS _col, pg_catalog.format_type(a.atttypid, a.atttypmod) AS _type \
    FROM pg_catalog.pg_attribute a WHERE a.attnum > 0 AND NOT a.attisdropped \
    ) \
    SELECT _tab AS table_name, _col AS column_name, _type AS column_type, _type AS short_column_type \
    FROM tables INNER JOIN cols USING (_oid)
Don’t forget to change command to run inside docker-compose.yml:
command: [
      "-configFile",
      "/config/dbname.properties",
      "-t",
      "/config/pgsql11_ft.properties"
    ]
After configuring your connections with the config files, you can run SchemaSpy. It will create a folder inside the output directory. Open it to find the .xml file.
Meta file
You can store comments for database fields and tables in a meta file. SchemaSpy will read comments from there.
Example of a meta.xml file:
<schemaMeta xmlns:xsi="http://www.w3.org/2001/XMLSchema-instance" xsi:noNamespaceSchemaLocation="http://schemaspy.org/xsd/6/schemameta.xsd" >
<comments>Database comment</comments>
<tables>
<table name="ACCOUNT" comments="I've added comment that links using markdown to markdown documentation [markdown](https://daringfireball.net/projects/markdown/)" >
<column name="accountId" comments='And now the schemaspy avatar ' />
</table>
</tables>
</schemaMeta>
The XML file contains the schema of your database. You can use this file to create the meta file, but the XML from the output folder contains excessive data that we don’t need. Use Notepad++ with the XML Tools plugin to clean it up.
Then:
- Go to Search > Find/Replace.
- Insert in the Find:
(?-s)\x20type="[^"]+"\x20?|id="[^"]+"\x20?|numRows="[^"]+"\x20?|schema="[^"]+"\x20?|digits="[^"]+"\x20?|nullable="[^"]+"\x20?|size="[^"]+"\x20?|typeCode="[^"]+"\x20?|autoUpdated="[^"]+"\x20?|defaultValue="[^"]+"\x20?. Hit Replace All twice (sometimes you may need three times). This will remove all unnecessary tags. - (Optional) Pretty Print the xml with XML Tools.
-
Create an XSL file with the content:
<xsl:stylesheet version="1.0" xmlns:xsl="http://www.w3.org/1999/XSL/Transform"> <xsl:output version="1.0" encoding="UTF-8"/> <xsl:template match="node()|@*"> <xsl:copy> <xsl:apply-templates select="node()|@*"/> </xsl:copy> </xsl:template> <xsl:template match="child|parent|index|primaryKey|checkConstraint|sequence"/> <!-- The tags we want to remove are here --> </xsl:stylesheet> - Go to Plugins > XML tools > XSL Transformation. Browse for the XSL file and apply.
- Replace
remarkswithcomments.
Insert <tables> content into the meta file:
<schemaMeta xmlns:xsi="http://www.w3.org/2001/XMLSchema-instance" xsi:noNamespaceSchemaLocation="http://schemaspy.org/xsd/6/schemameta.xsd" >
  <comments>Database comment</comments>
      <!-- tables go here -->
</schemaMeta>
Layout
The templates (HTML, CSS, and JS) that SchemaSpy uses to generate documentation are stored in a .jar file (which can be opened like a regular archive), in BOOT-INF/classes/layout.
With these templates, you can:
- Edit titles, menus, and text (translate them, for example).
- Change JavaScript and HTML (add or hide columns).
-
For translation, edit the following files:
container.html– the menumain.html– column names on the main pageanomalies.html,column.html,constraint.html,orphans.html,relationships.html, routines.html.tables/table.html– titles and text from the Table page.
Exclude column
You can remove columns you don’t need by editing the layout file. Let’s remove the number of columns from the main page.
- Open
main.htmlin a text editor. Somewhere around line 50 table html code starts. - In the
thead > trtag, find the required line and comment it out. These are the table headers. It is also possible to comment out the variable calls with `` brackets around them. - There is another tag
tbody>tryou need to comment out. - That’s it! Now the column with the column number will be hidden.
Add row numbers
Sometimes you need to show the column number in the table. Here are two ways to do it.
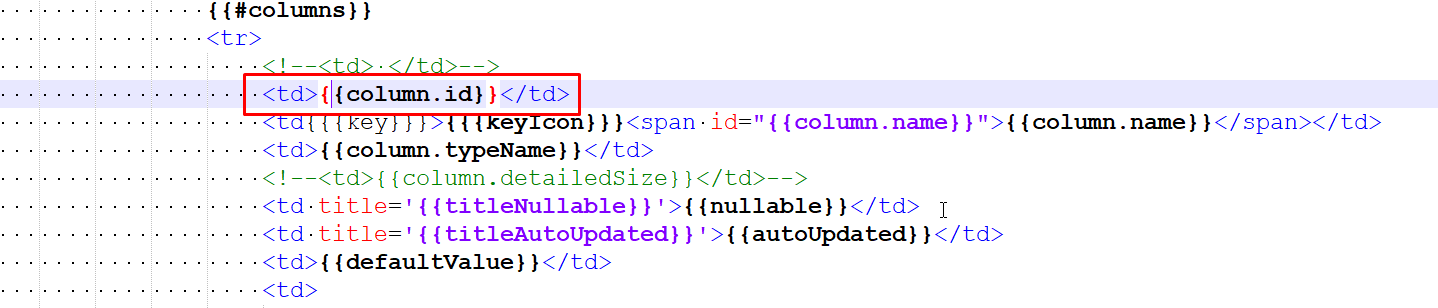
Column Id
Open layout/tables/table.html. Add a column in the table header (around line 40).
  <tr>
    <th title='Num'><span>Num</span></th>
    <th>Name</th>
    <th>Type</th>
    <!-- .... -->
  </tr>
Around line 57, add a table row for the created column. Specify the variable ``. Save the file. Now, on the Tables page, the first column will display the column ID.
CSS Numbering
This method is slightly more complex as it entails manual changes to the generated report, due to a known issue where the -css option doesn’t function as expected. You will have to add CSS manually.
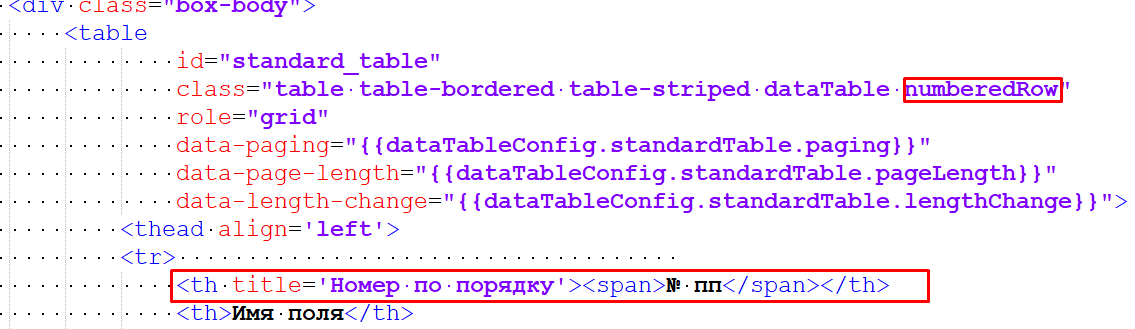
Open table.html. Go to the same table header. In addition to the new column, we now also need to add a class to the numberedRow table. This helps us identify the table in the CSS file.
Add a blank line below (around line 57).

Generate the database documentation with SchemaSpy and the layout. Initially, the new column in the table will be empty because there is no CSS yet.
Go to the output folder (with the generated report). Open the schemaSpy.css file, add the following lines at the beginning, and save:
table.numberedRow {
  counter-reset: row-num;
  counter-set: -1;
}
table.numberedRow>tbody>tr {
  counter-increment: row-num;
}
table.numberedRow>tbody>tr>td:first-child::before {
  content: counter(row-num) " ";
}
Refresh the page with the table, and voila! Numbering will appear.
Conclusion
SchemaSpy is an invaluable tool for creating and maintaining database documentation. It can be automated and integrated into CI/CD processes, reducing the need for manual intervention. The primary challenge that remains is addressing the inability to differentiate between column names that are the same but case-sensitive (a common issue in PostgreSQL).
Disclaimer: This text was enhanced with the assistance of ChatGPT 4, focusing on spelling corrections and natural English phrasing. Do you like the result? :D